
Wheel Application Installation
Windows
To install the Pick ‘N’ Place Wheel app on a windows machine, you have two options:
Desktop App
Download and install the latest windows installer file from https://github.com/ahmsville/Pick-N-Place_Wheel/releases (installs just like any executable .exe file).
Web Server App
If you’ll like to be able to access the app on other devices on your network, you can set up your computer as a server for the wheel app, and access it through an IP address on any smart device.
Web Server App
(Windows)
How to set up and use the web app on windows
Step 1: (Enable Internet Information Service (IIS))
in windows, go to Control Panel -> All Control Panel Items -> Programs and Features and click on Turn Windows features on or off.
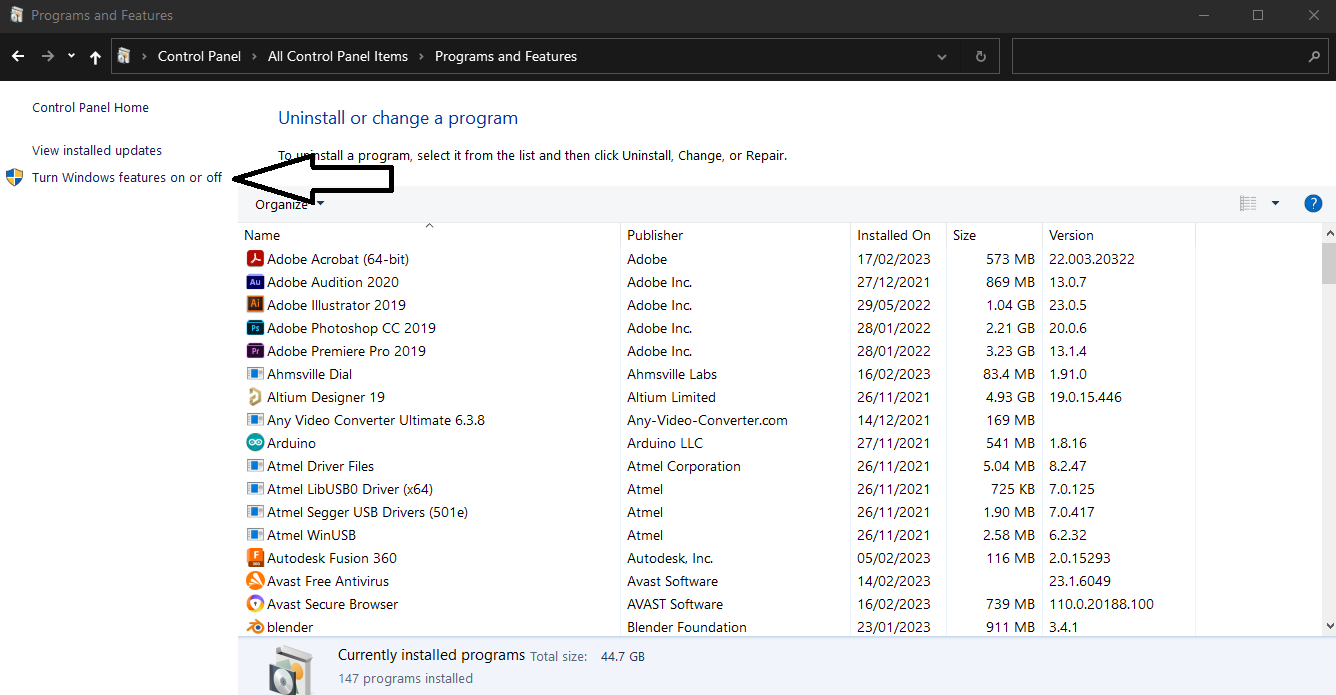
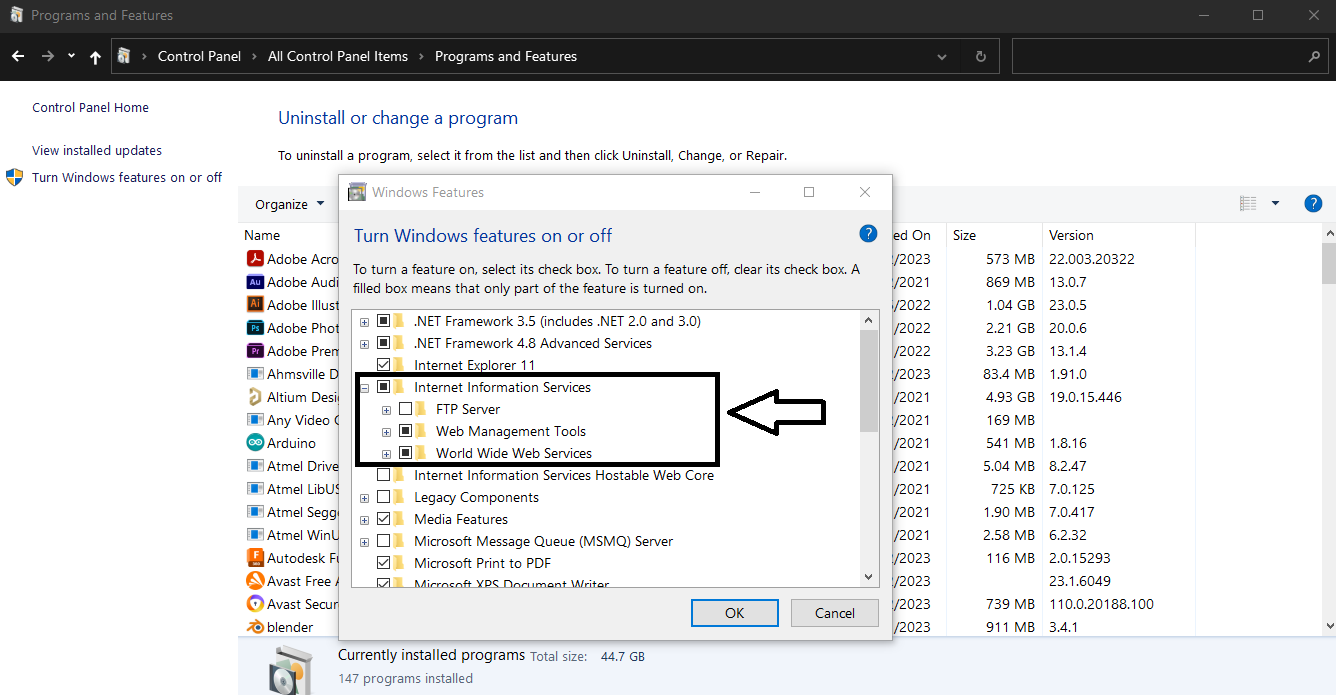
Enable Internet Information Service (IIS) and wait for windows to apply the changes.
Step 2: (install .NET Core Hosting Bundle)
Go to https://dotnet.microsoft.com/permalink/dotnetcore-current-windows-runtime-bundle-installer to download .net core hosting bundle.
Install the downloaded installer.
Step 3: (Download Pick ‘N’ Place Wheel Web App)
Go to https://github.com/ahmsville/Pick-N-Place_Wheel/releases and download the latest Web Portable release, this is going to be a zip file containing the web app files.
Step 4: (Set up a site on IIS)
On your computer navigate to C:\inetpub\wwwroot.
Create a new folder in the wwwroot folder (e.g “PNPWHEEL”)
Extract the files in the downloaded zip Pick ‘N’ Place Wheel app to the newly created folder.

Open Internet Information Service by searching IIS on the start window.
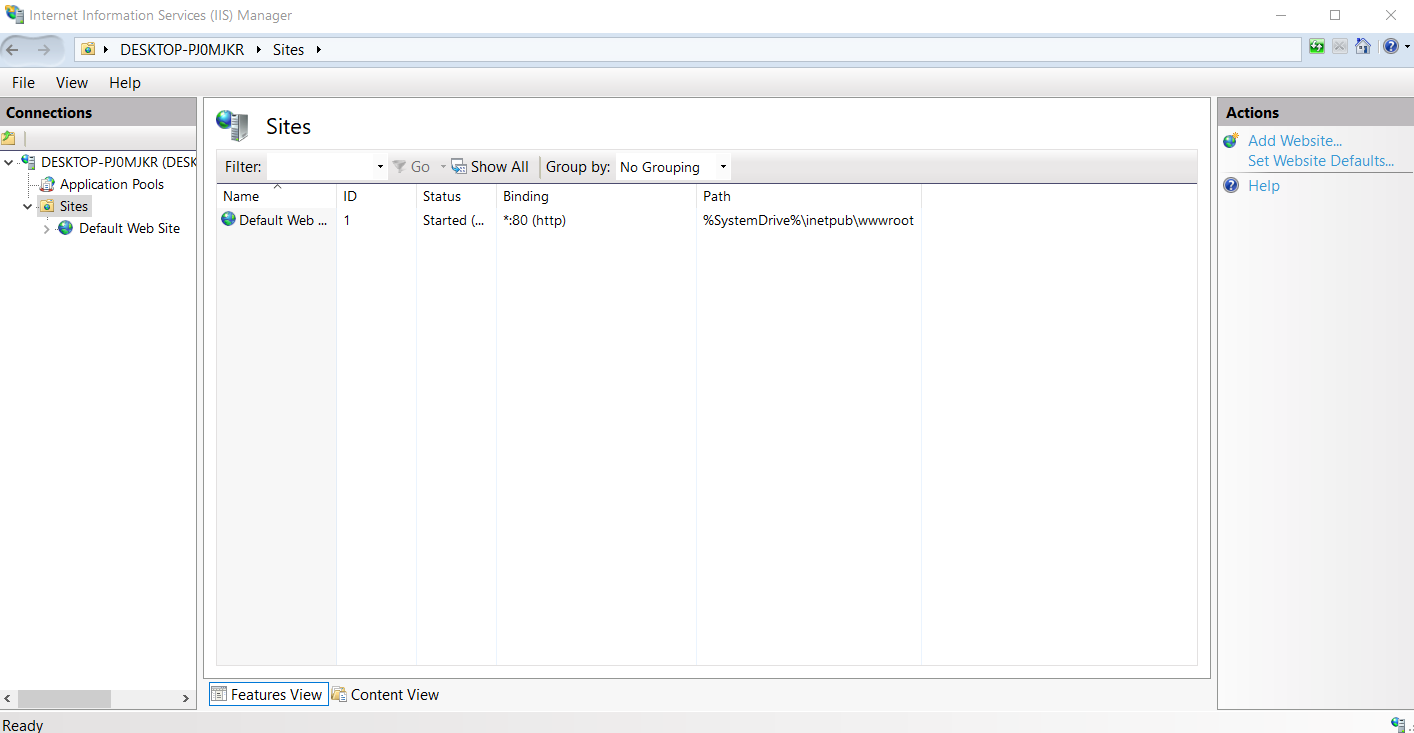
Right-click on sites and click on add website
Configure the site details and point the physical path to the PNPWHEEL folder.

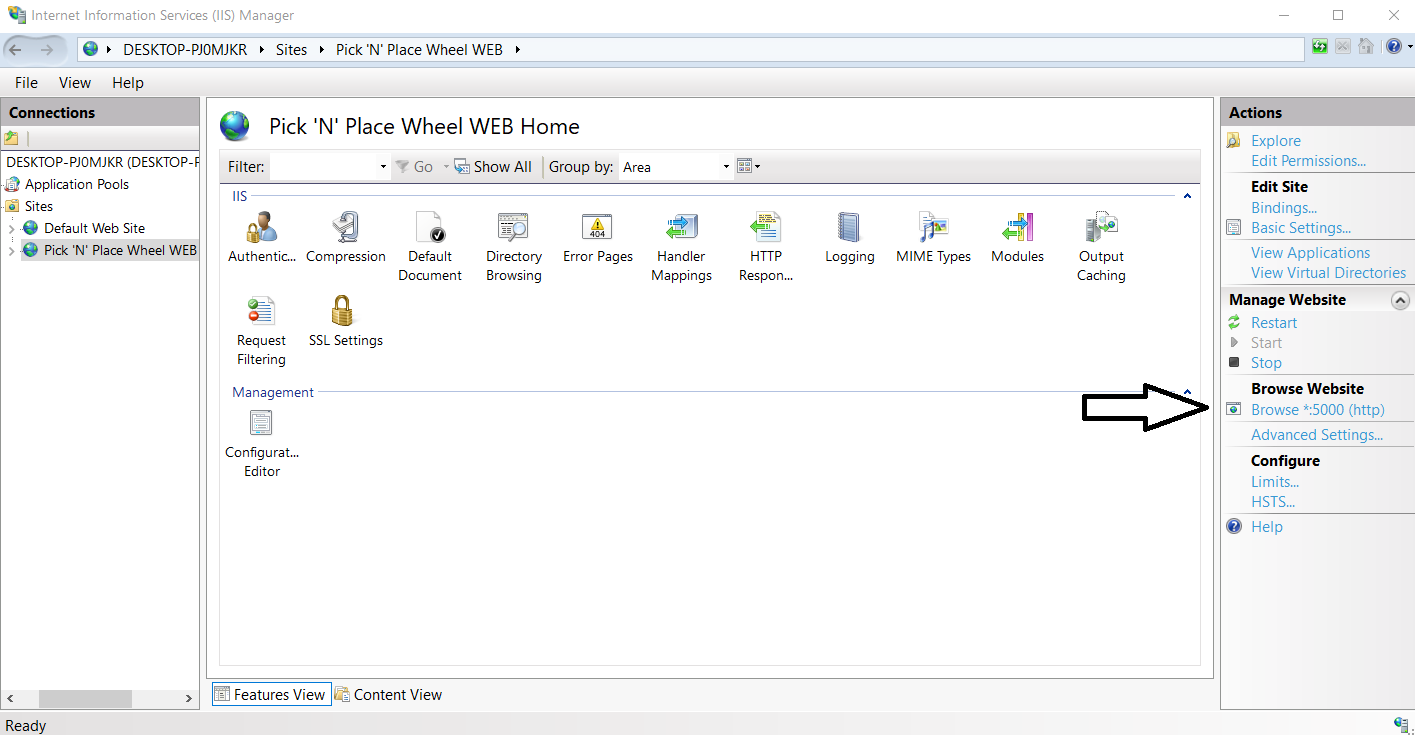
Click on Browse *.5000(http) to test the app, you should see the application interface displayed in your browser.
Step 5: (Firewall settings)
The app should already be working on the computer it is set up on, but to be able access it on other devices you need to create a new rule in windows firewall.
Open Windows Defender Firewall with Advanced Security from the start window
(Raspberry pi)
How to set up and use the web app on a Raspberry pi
(These steps will also work on other Linux machines)
The new Pick N Place Wheel web application is a cross-platform Dotnet 5 Blazor server application, so it should run on Windows, Mac, and Linux operating systems.
In this guide, I’ll be showing you how to set up the Raspberry pi as a server for the Pick N Place Wheel App, so that you can serve it anywhere on your local network, you can run it by connecting a screen and a keyboard to the pi, or through any web browser on your computer, tablet or phone.
Here’s an overview of everything you need to do to set up the Pick N Place Wheel App on your raspberry pi:
Download and setup.net core 5 on the pi
Download the published Pick N Place Wheel web app
Install and setup nginx as a reverse proxy
Create kestrel service for the app
For this guide, you don’t need a screen or keyboard for the pi, everything is going to be done via SSH (remote access), I am using putty, but feel free to use your preferred terminal.
Step 1: (downloading the required files)
Head to https://dotnet.microsoft.com/download/dotnet/7.0 to download the.net SDK and runtime for Linux Arm32.
Once you have.net SDK and Runtime files downloaded, head to the release page of the Pick N Place Wheel to download the published zip file for the Pick-N-Place Wheel Web App. https://github.com/ahmsville/Pick-N-Place_Wheel/releases make sure to download the Pick-N-Place Wheel Web Portable and not the windows installer versions.
Step 2: (copy downloaded files to the raspberry pi)
Once you have all three files on your computer, you’ll need to copy them over to your raspberry pi, for this I am using pscp since it comes standard with putty, but again you can use any software you prefer for this.
Open the command prompt and enter the following commands:
To copy.net 5 SDK
-pscp -r "C:\Users\ahmsv\Downloads\dotnet-sdk-7.0.201-linux-arm.tar.gz" pi@192.168.8.100:/home/piTo copy ASP.NET Core 5.0 Runtime
-pscp -r "C:\Users\ahmsv\Downloads\aspnetcore-runtime-7.0.3-linux-arm.tar.gz" pi@192.168.8.100:/home/piTo copy Pick-N-Place Wheel app
-pscp -r "C:\Users\ahmsv\Downloads\Pick-N-Place.Wheel.Web.cross.platform_frm-dep_portable.v2.0.zip" pi@192.168.8.100:/home/piStep 3: (unpack the files)
Login to your raspberry pi via SSH and enter the following commands.
-sudo mkdir dotnet_7.0.2
-sudo tar zxf dotnet-sdk-7.0.201-linux-arm.tar.gz -C dotnet_7.0.2
-sudo tar zxf aspnetcore-runtime-7.0.3-linux-arm.tar.gz -C dotnet_7.0.2
-sudo mkdir Pick-N-Place-Wheel
-sudo unzip Pick-N-Place.Wheel.Web.cross.platform_frm-dep_portable.v2.0.zip -d Pick-N-Place-Wheel
Step 4: (setup .net 7 on the pi)
To permanently setup.net on the raspberry pi, run:
nano .bashrcand copy the following to the end of the file…
DOTNET_ROOT=$HOME/dotnet_7.0.2
export PATH=$PATH:$HOME/dotnet_7.0.2
reboot the pi with:
sudo rebootonce the pi reboots, log in to it again through SSH and confirm that.net 5 and asp dotnet runtime is setup correctly with:
dotnet --infoif everything looks good, you can do a quick test by running the Pick N Place wheel app with:
-cd Pick-N-Place-Wheel
-dotnet "Pick-N-Place Wheel Web.dll"
The app should be started and listening on port 5000, if you happen to have a screen and keyboard connected to the pi you can confirm this from the browser by navigating to http://localhost:5000
Close the app with:
Ctrl + c
Step 5: (install and setup nginx)
Enter the following commands into the terminal to install nginx
-sudo apt-get update
-sudo apt-get install nginx
After the installation, you can check that nginx is running with:
sudo systemctl status nginxyou can also navigate to the raspberry pi’s IP address from any browser, and you should see the welcome to nginx page.
Next, you need to configure a nginx server as a reverse proxy for the pick n place wheel app, so that you can access it anywhere on your local network.
Unlink the default welcome page with:
sudo unlink /etc/nginx/sites-enabled/defaultcreate a new server configuration file with:
sudo nano /etc/nginx/sites-available/pnpwheelsite.confcopy the following texts into the file and save it:
server {
listen 5001 default_server;
server_name pnpwheel.local *.pnpwheel.local;
location / {
proxy_pass http://localhost:5000;
proxy_http_version 1.1;
proxy_set_header Upgrade $http_upgrade;
proxy_set_header Connection $connection_upgrade;
proxy_set_header Host $host;
proxy_cache_bypass $http_upgrade;
proxy_set_header X-Forwarded-For $proxy_add_x_forwarded_for;
proxy_set_header X-Forwarded-Proto $scheme;
}
}
Link the new configuration to nginx enabled-sites with:
sudo ln -s /etc/nginx/sites-available/pnpwheelsite.conf /etc/nginx/sites-enabled/you also need to modify the default nginx.conf file with:
sudo nano /etc/nginx/nginx.confcomment out all the configurations under the http section except for the following lines:
access_log /var/log/nginx/access.log;
error_log /var/log/nginx/error.log;
include /etc/nginx/conf.d/*.conf;
include /etc/nginx/sites-enabled/*;
copy the following configuration into the http section of the configuration file and save it.
map $http_connection $connection_upgrade {
"~*Upgrade" $http_connection;
default keep-alive;
}
Test the configuration syntax with:
sudo nginx -tif the test is ok, reload nginx with:
sudo nginx -s reloadStep 6: (creating a Kestrel service)
To create a Kestrel service for the pick-n-place wheel app so that it is automatically started when the raspberry pi boots, use:
sudo nano /etc/systemd/system/kestrel-Pick-N-Place-Wheel-Web.servicecopy the following text into the file and save it:
[Unit]
Description=Pick-N-Place Wheel Web
[Service]
WorkingDirectory=/home/pi/Pick-N-Place-Wheel
ExecStart=/home/pi/dotnet_7.0.2/dotnet "/home/pi/Pick-N-Place-Wheel/Pick-N-Place Wheel Web.dll"
Restart=always
RestartSec=10
KillSignal=SIGINT
SyslogIdentifier=PnPWheel
User=www-data
Environment=ASPNETCORE_ENVIRONMENT=Production
Environment=DOTNET_PRINT_TELEMETRY_MESSAGE=false
[Install]
WantedBy=multi-user.target
Enable the service with:
sudo systemctl enable kestrel-Pick-N-Place-Wheel-Web.serviceStart the service with:
sudo systemctl start kestrel-Pick-N-Place-Wheel-Web.serviceConfirm that the service successfully started the app with:
sudo systemctl status kestrel-Pick-N-Place-Wheel-Web.serviceStep 6: (permission fix)
Enter the following commands to ensure you don’t get any weird permission issues when using the app:
-sudo chmod -R 757 Pick-N-Place-Wheel
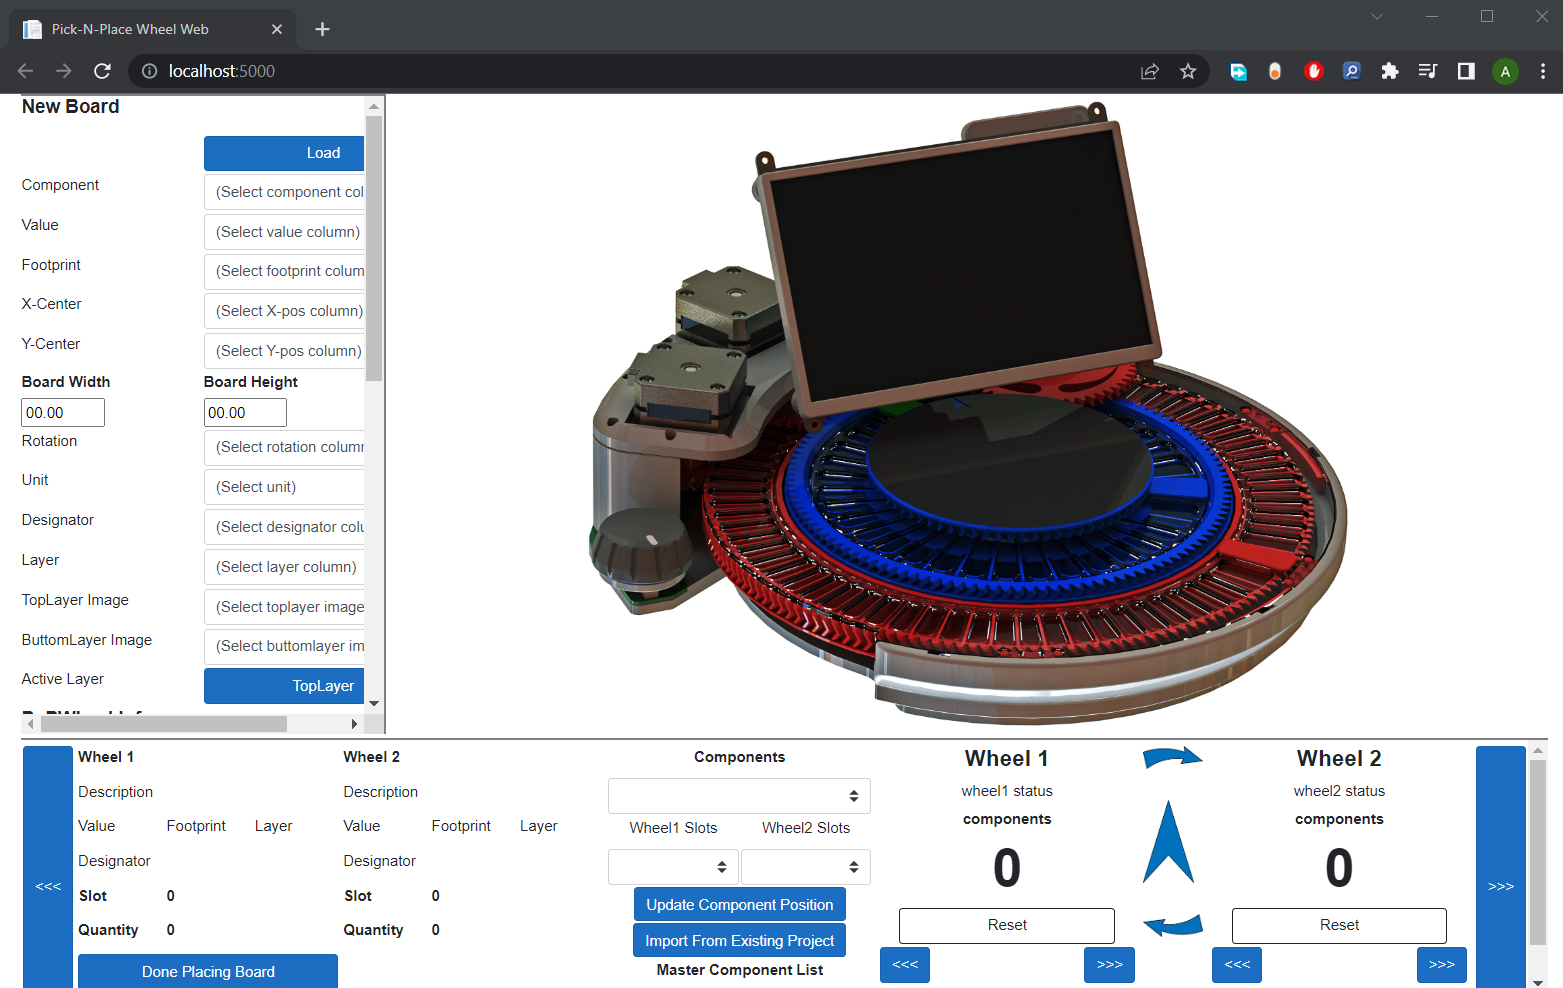
-sudo adduser www-data dialoutYou are now fully setup to use the Pick-N-Place Wheel and the App on the Raspberry pi, simply connect your Wheel to the raspberry pi, open a web browser, and navigate to http://<pi’sIP address>:5001 (http://192.168.8.102:5001/), you should see the Pick-N-Place Wheel interface.
The operation and appearance of the web app are very similar to that of the desktop app, so all the setup instructions on the project setup page of the Pick-N-Place Wheel apply here as well, the only difference is in how you load the project files, as a server app, the files used by the app are stored within the server itself, so when you generate your project csv file and board image, you will have to upload them to the server to be used by the app. All this can be done from the load project dialog box which you get to by clicking on the load button.
I’ve also included a sample project for reference purposes.
For the full instruction on how to prepare files and set up a Pick-N-Place Wheel project, head to the setup blog.