
The Ahmsville Dial Project
Like many other Engineers, Makers, and content creators, I use a lot of design tools, from CAD applications, and PCB design software, to Graphics design suites. so naturally I’m always looking for ways to make my process more seamless and efficient.
A mouse and a keyboard; while often sufficient for interacting with these applications, cannot compare to the convenience of having a dedicated device that’s designed and optimized for performing specific operations like zooming, scrolling, traversing a 3d space, and repetitive operations in general.
Having the freedom to design such a device for myself, means I can tailor it to my experiences and design a device that satisfies everything I think a secondary controller should be able to do, and that’s exactly what the Ahmsville Dial is.
The Goal
I started the Dial’s design and development with very specific goals in mind:
To design the dial to be long-lasting despite being a 3D printed device, which simply means minimizing the use of components and features with a short life cycle.
To design for wired and wireless operation.
To make it easy to set up for everyone, considering the fact that not everyone has a background in programming, this largely meant developing a dedicated companion app for the dial.
To give the dial automatic context switching, meaning, having the dial automatically switch its configurations to match whatever software or environment that’s currently active on the computer.
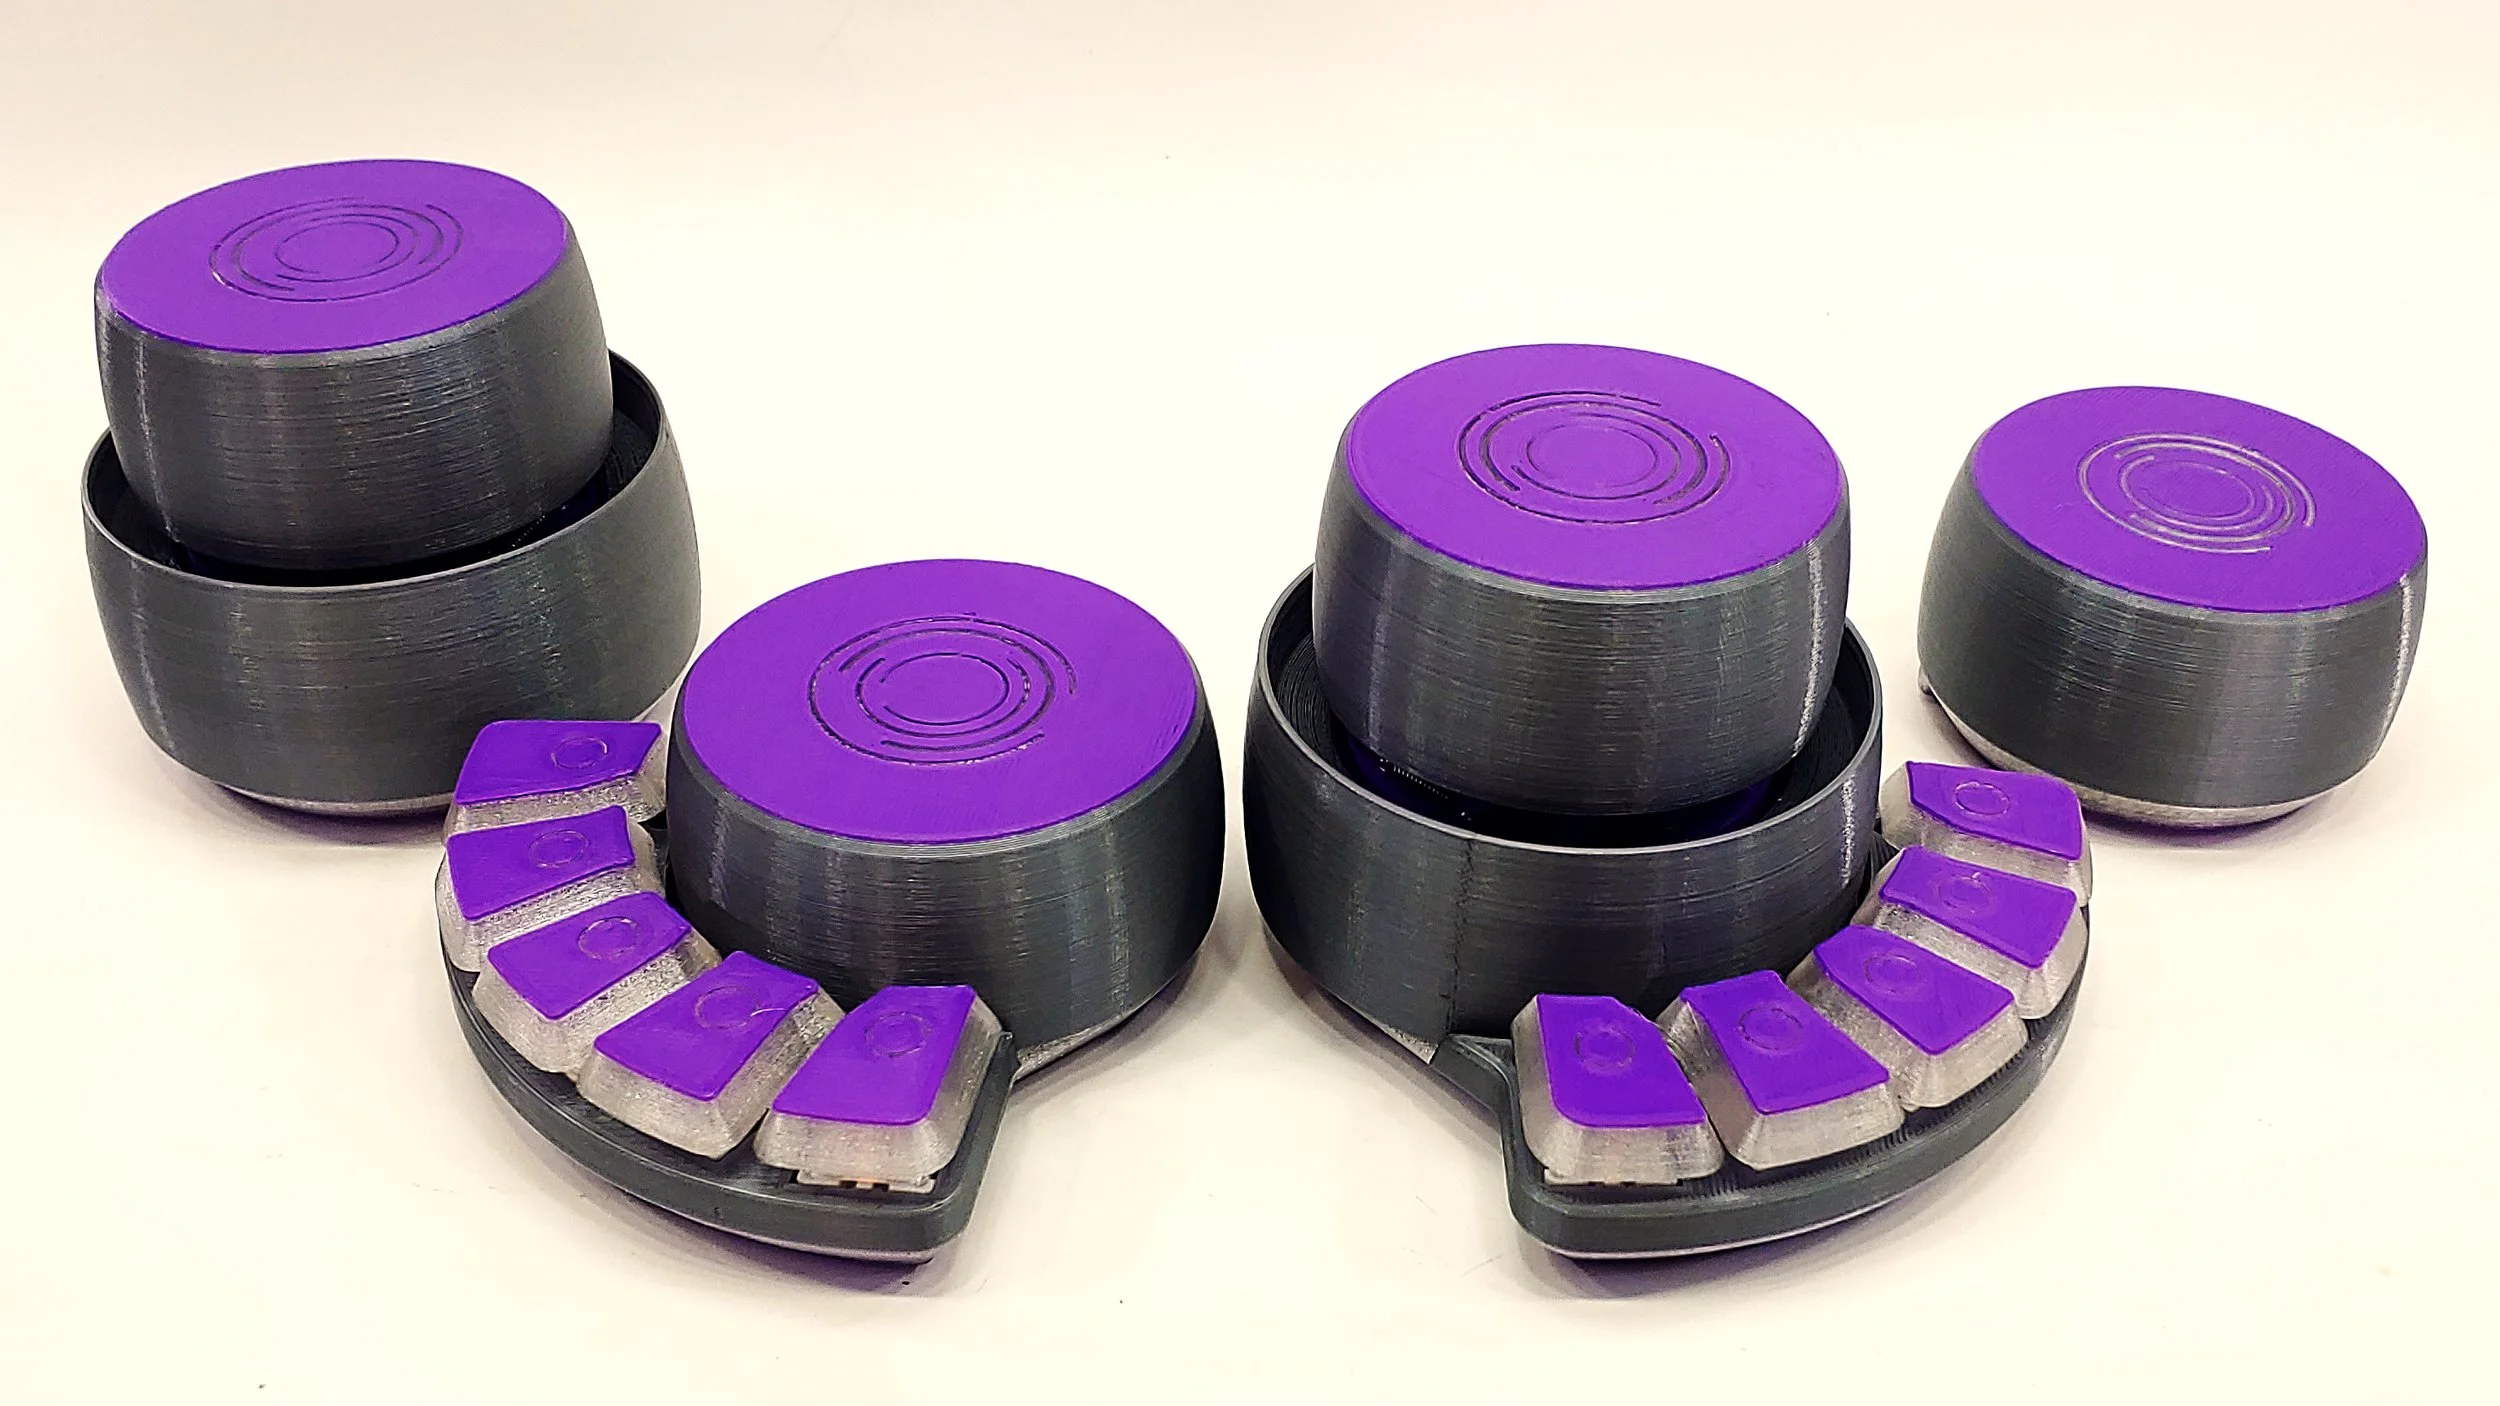
To design different variants of the Dial for the different types of users out there.
Dial Hardware Features
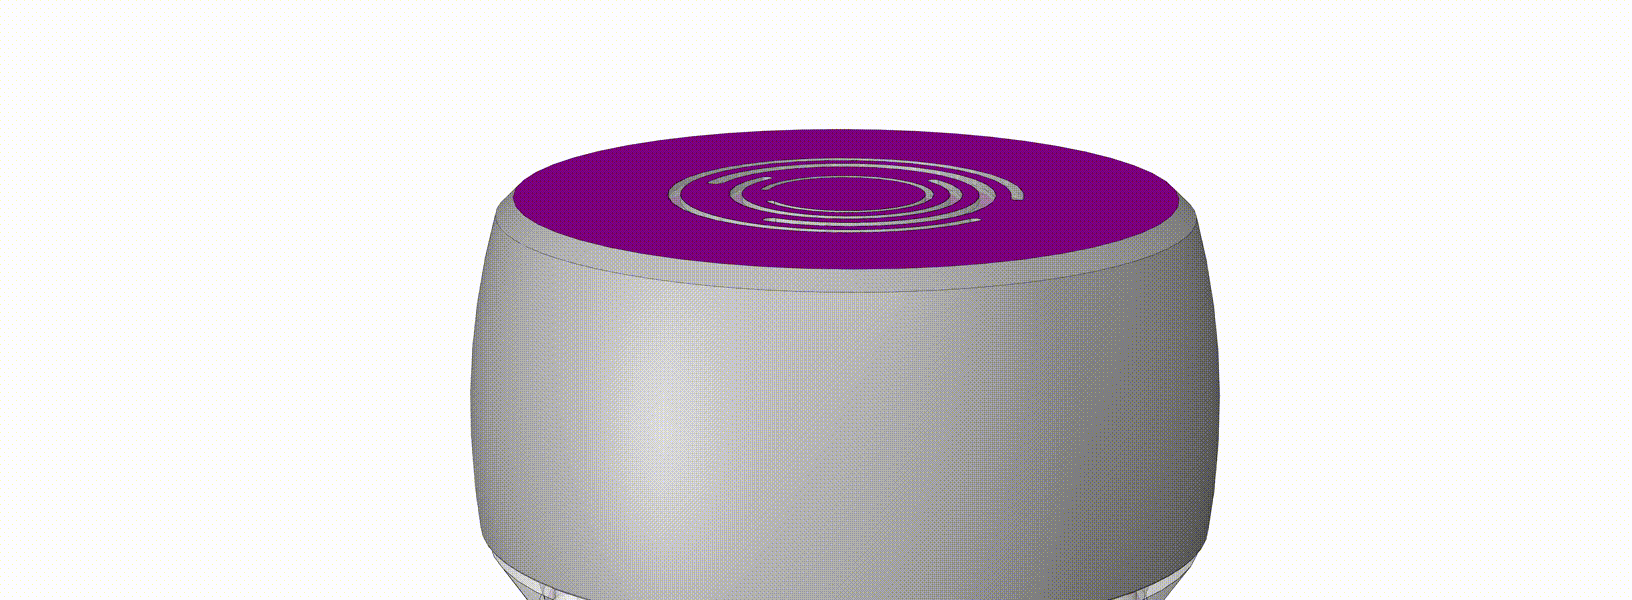
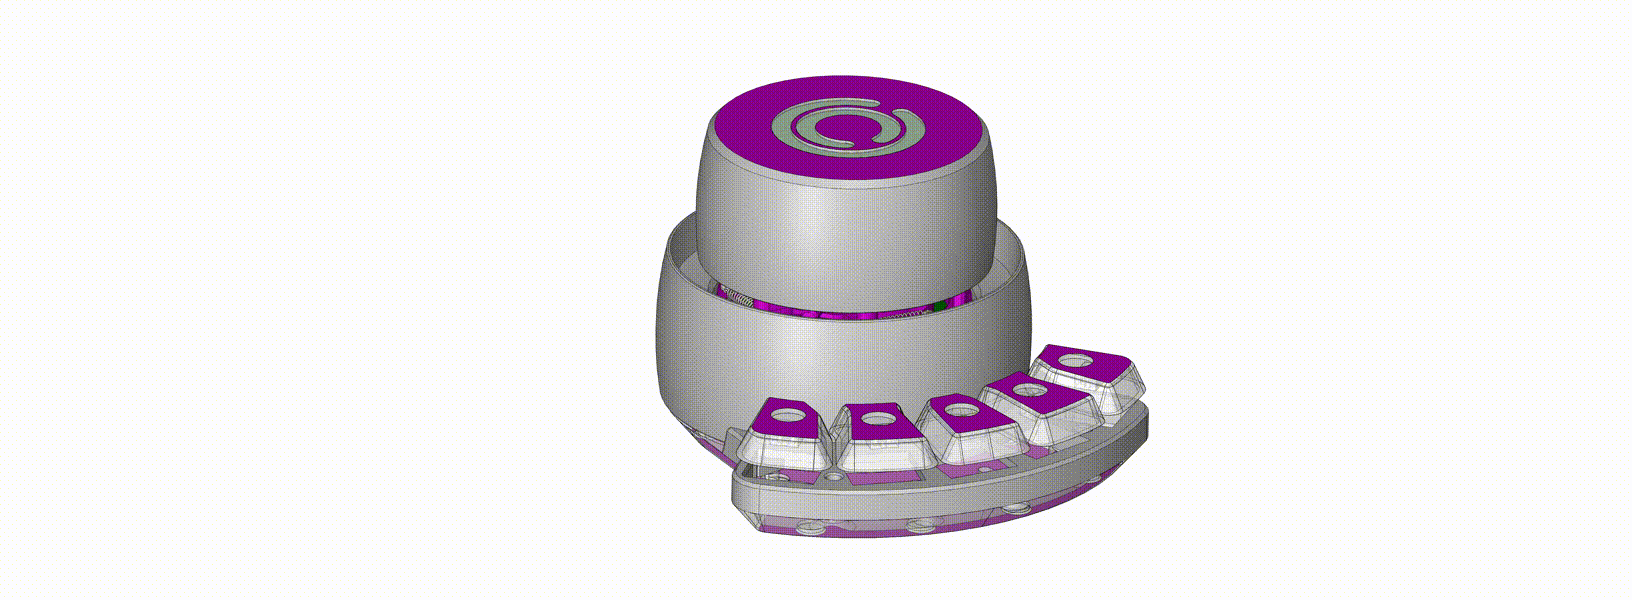
The Knob (Magnetic Rotary Encoder)
Every secondary controller should have a rotary knob in my opinion, and the Ahmsville dial features a very special one.
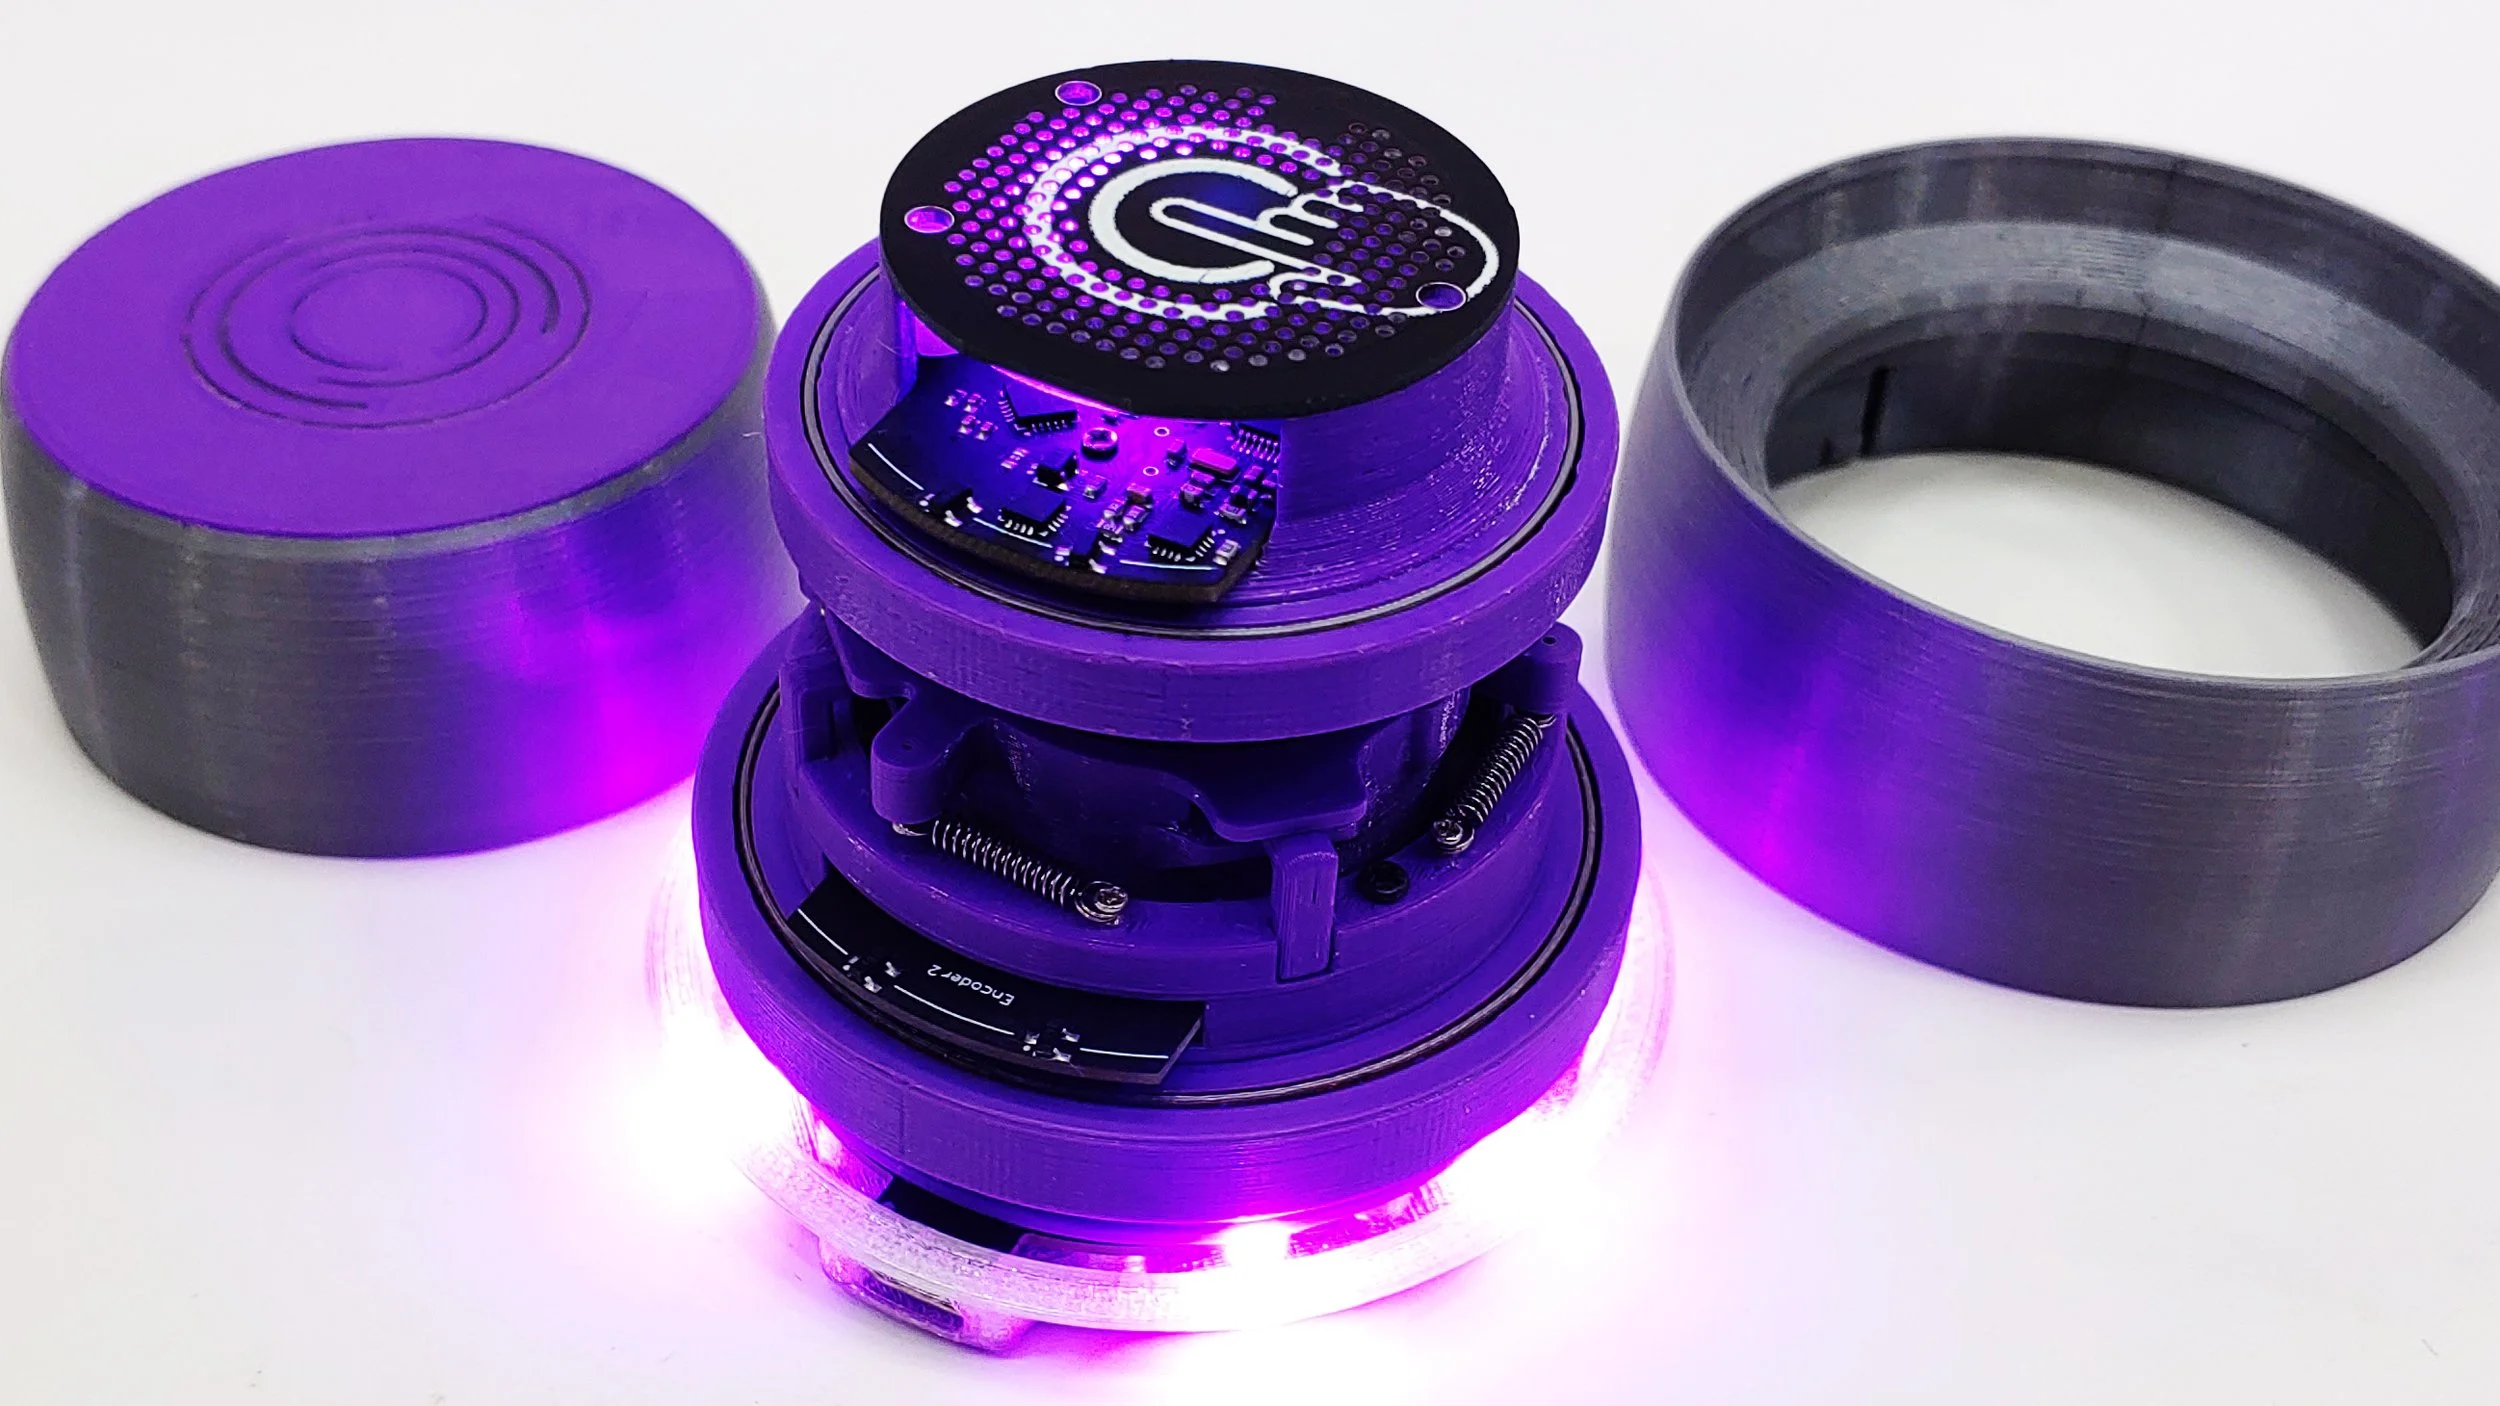
The rotary encoding method used in the dial is one of my very own designs, in fact, I developed it specifically for the Ahmsville Dial; although the encoder has found its way into a few of my other projects.
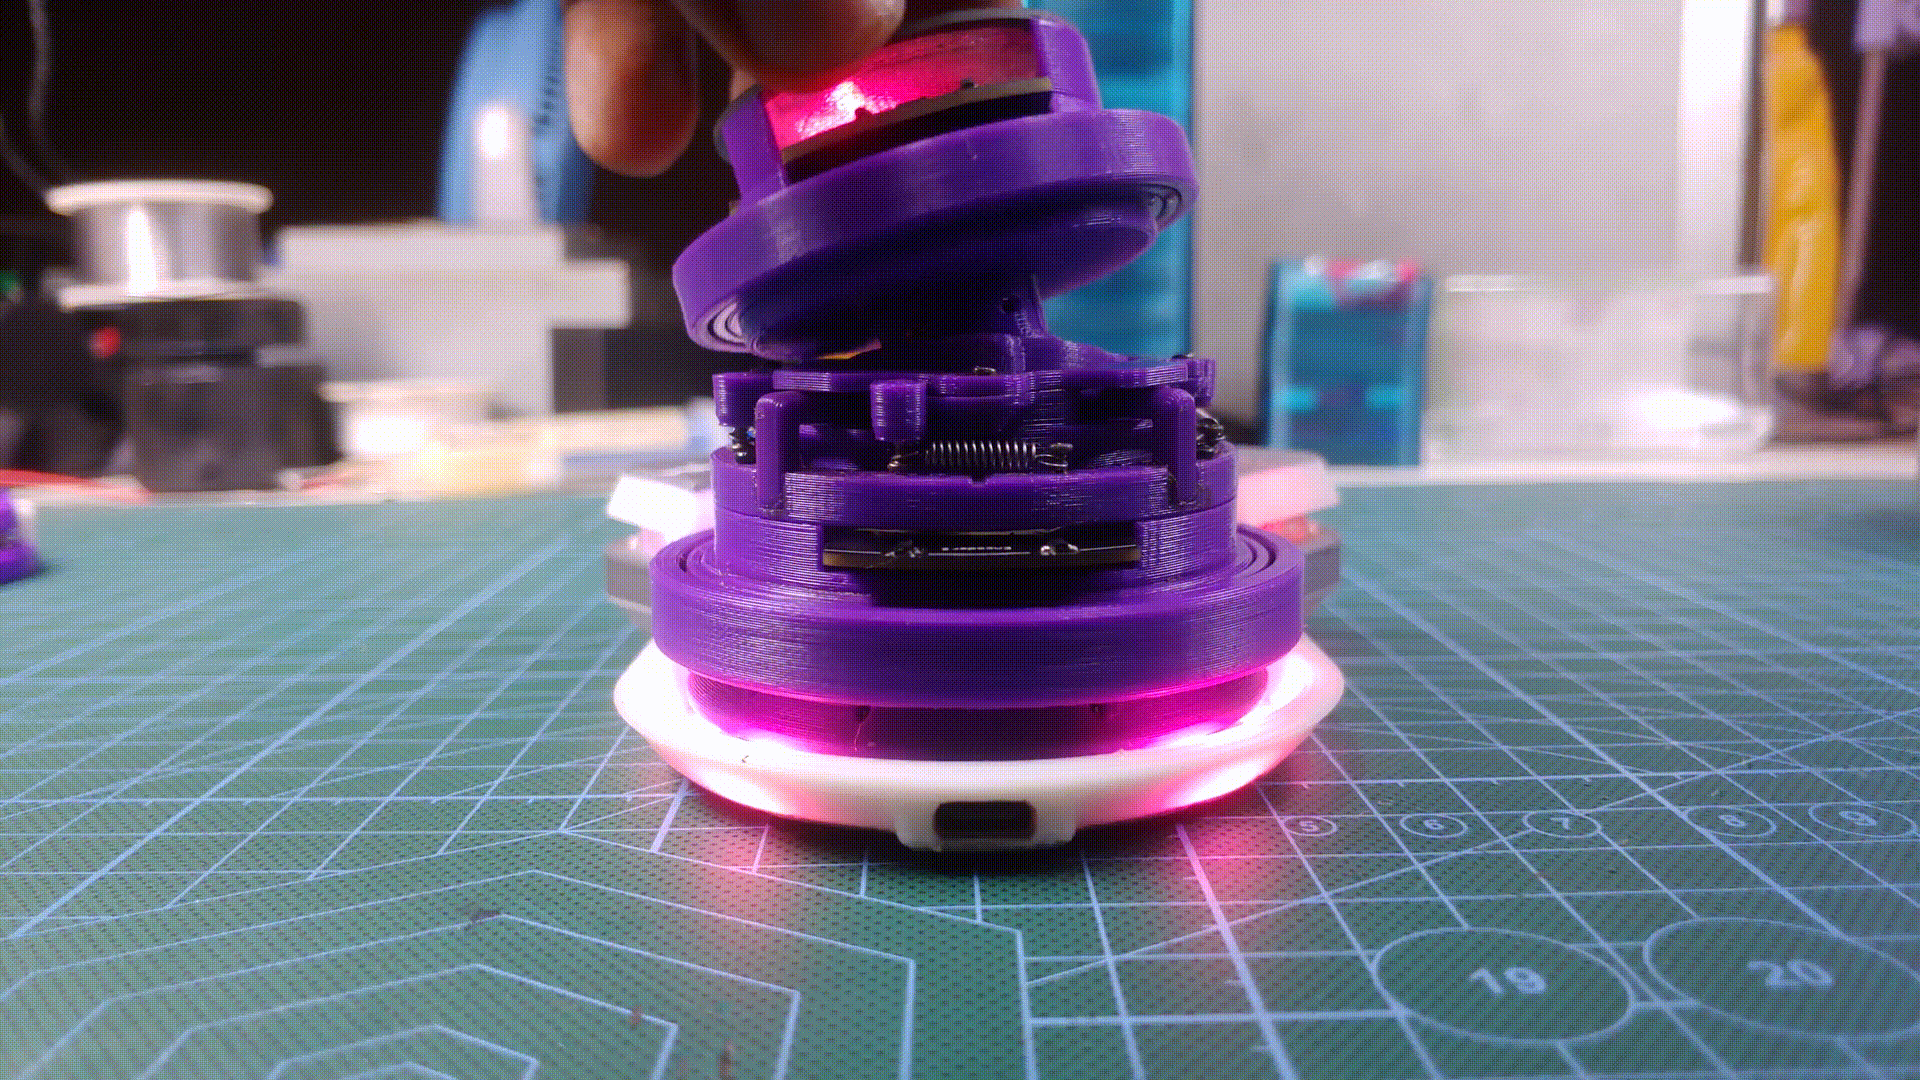
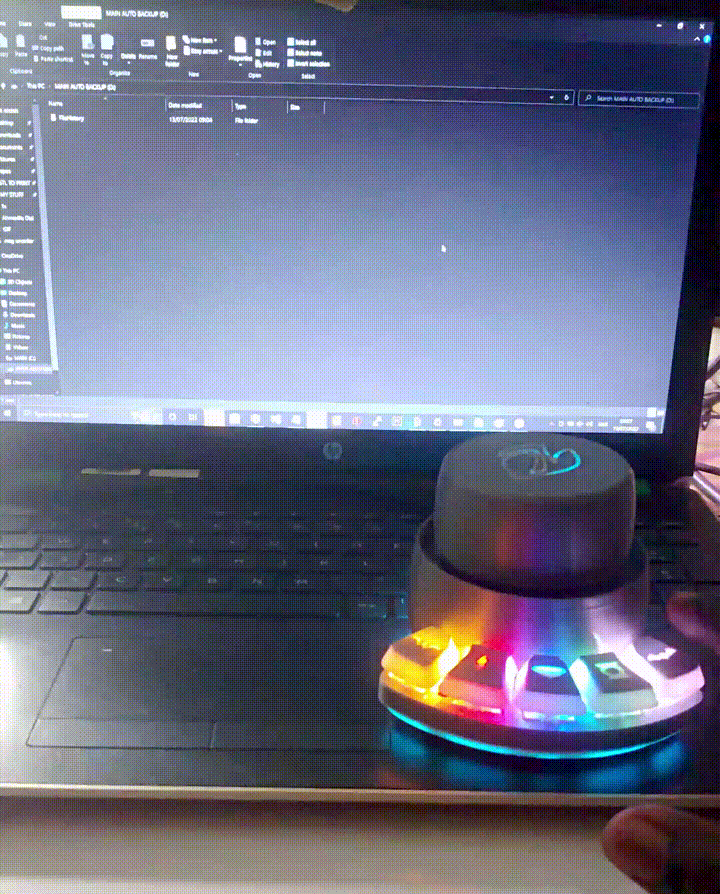
The encoder has a super high resolution and operates contactless, the knob on the dial is fitted with a ring of tiny neodymium magnets in an alternating magnetic pole configuration; on the main board, there are two linear hall effect sensors used to read the analog values on the magnets. This system allows the knob to operate through a ball bearing without ever touching the electronics, which makes for a very smooth feeling knob, and it’s one of the considerations I made to ensure that the dial is durable. This trend of isolating all moving parts from the electronics is something you will notice with all the hardware features of the Ahmsville Dial.
The knob has a base resolution of 80 steps per revolution and can go as high as 8000 steps using interpolation/micro-stepping, the spacenav and the absolute variants of the dial features two of these encoders, with the second knob being a higher resolution at 100 steps per revolution and can go as high as 10000 steps. You can learn more about this rotary encoder here - https://github.com/ahmsville/Magnetic_rotary_encoding
Capacitive Touch
I choose a capacitive touch input for the dial because it has no moving parts and so it cannot physically fail; so long as the software stays the same, a capacitive touch input will always feel and operate consistently.
The capacitive touch lives under the knob of the dial, it’s a backlit haptic capacitive touchpad that’s programmed to recognize five touch inputs types: single tap, double tap, short press, long press, and a super-long press which I reserved for special operations like putting the dial to sleep.
You may be wondering how a single touchpad is able to detect so many touch input types, and more importantly, how you distinguish between the different levels of touch, the answer to that lies in the haptics built into the dial, the dial will vibrate in distinct ways when you touch the surface to signify the touch types, it’s something you kind of have to feel to understand, you can learn more about the capacitive touch implementation here.
Macro Pad
Macros are pretty great; being able to fire off an operation from a single key is essential for secondary controllers, mechanical switches seem to be the preferred hardware for them, so I figured; if it ain’t broke.
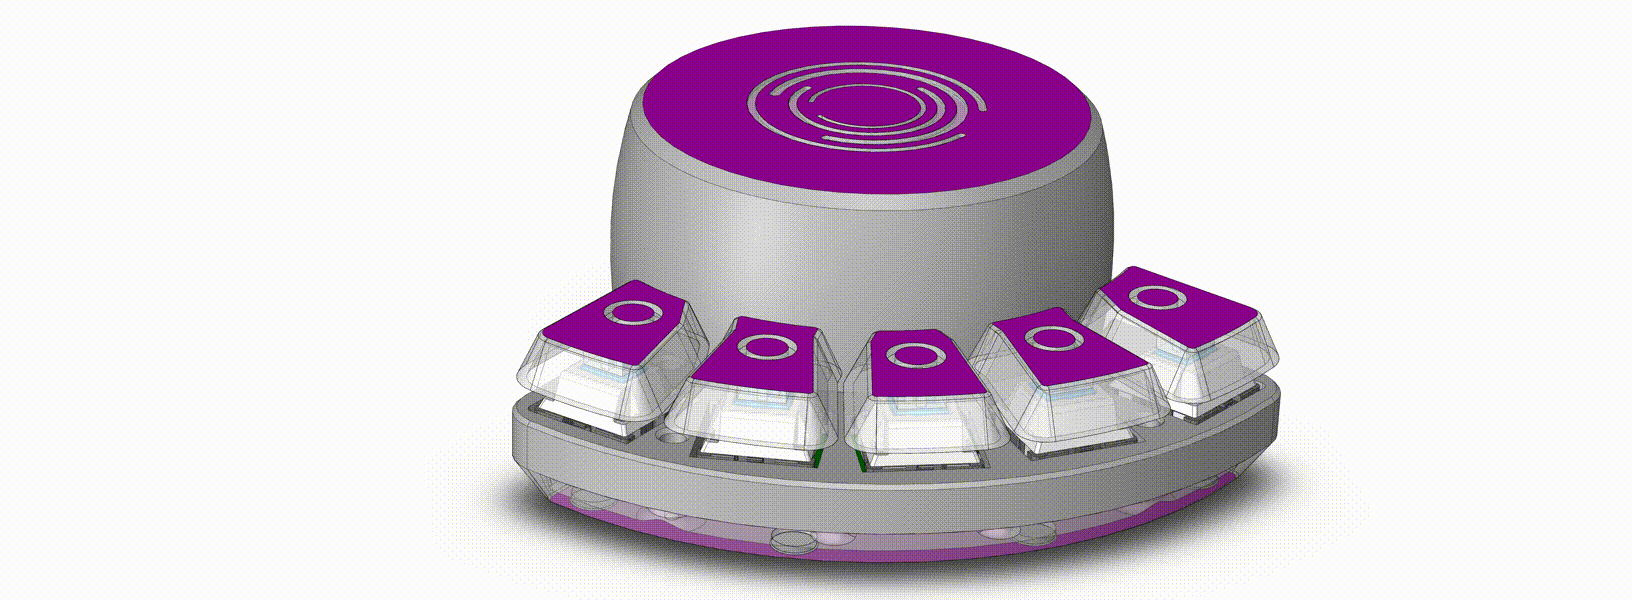
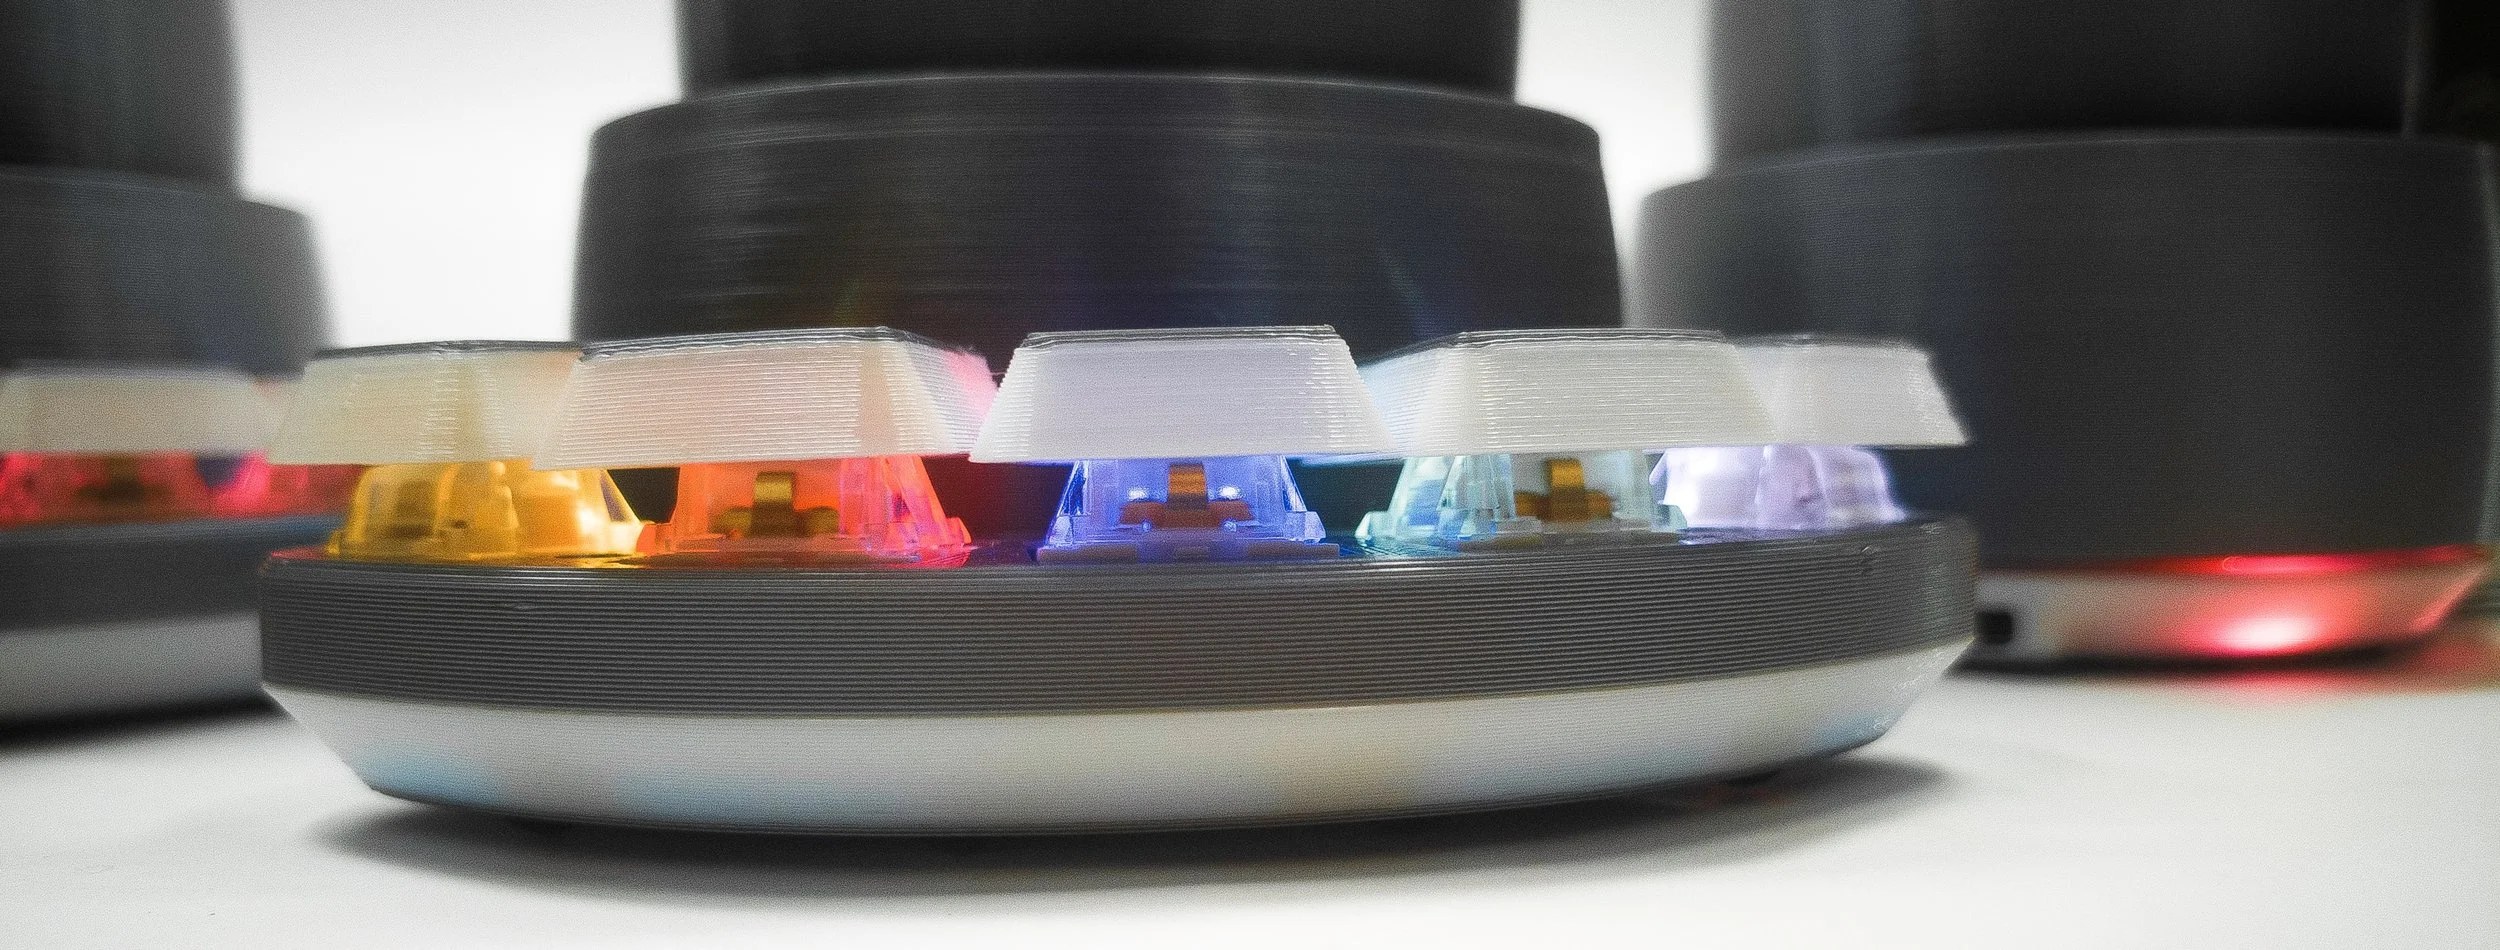
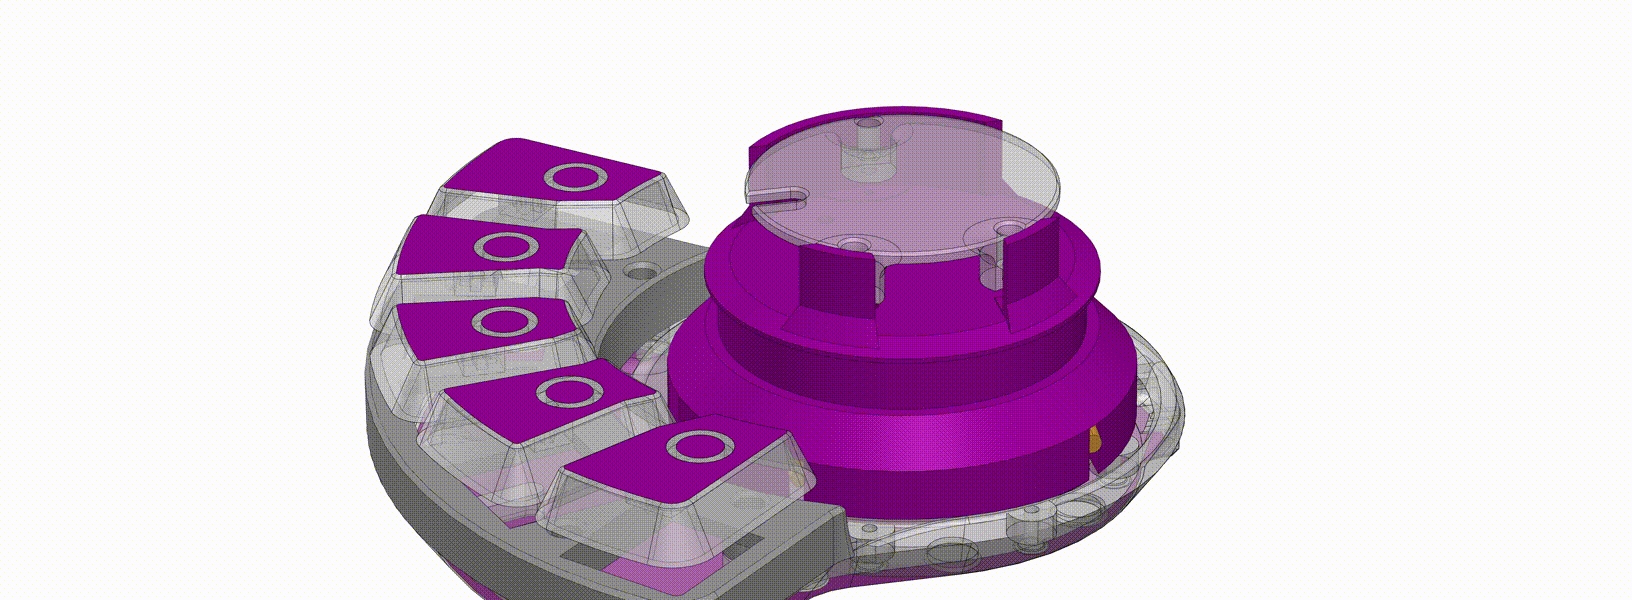
The Macrokey and the Absolute variants of the dial feature 5 gateron clear mechanical switches, each key is interrupt-based and is programmed to register tap and hold as two separate inputs, making a total of 10 mappable macros from just 5 keys. Each key is also individually backlit and is fully customizable through the companion app.
5-Axis Space Navigator
With the loads of CAD designs I do, I figured it’ll be really helpful to have a dedicated controller, something that makes navigation in a 3D space more intuitive.
This feature was designed specifically for 3D and CAD-related work, but it’s also suited as a multiple-axis controller, maybe for robots, drones, and RC cars.
Using the mpu6050 motion tracking chip, together with another of my magnet/hall effect sensor setup, I was able to create a 5-axis controller. The mpu6050 chip provides pitch and roll data, while the magnets and hall effect sensors provide movement data for the x, y plane, and the fifth axis; Yaw is used to implement a feature I tentatively called adaptive space navigation; this feature works by detecting when and by how much the dial rotates about the z axis(yaw) and then moving all the axis in software to match that angular deviation.
With this feature, the dial is able to automatically adjust its internal axis to match any change in its physical orientation so no matter the physical orientation of the dial, normal directions will be maintained. “up will always be up, and down will always be down”.
The underlying code for reading the motion data from the mpu6050 is provided by the i2cdevlib by Jeff Rowberg.
The second most important part of the spacenav is the mechanism that allows the entire top section of the dial to move in 4 axis, it’s a fairly complex spring-loaded mechanism designed to be 3d printed, but held together with standard machined parts.

I went through quite a few iterations to make sure the mechanism was durable and able to reliably provide movements in all the required directions, so I am quite proud of it. You can learn more about it below.
LEDs and Haptic Feedback
The dial feature a few strategically placed SMT addressable LEDs that provide some functional aesthetics to the dial, the LEDs don’t just make the dial look really cool, they also provide additional functionalities to the dial. For example, programming application-specific keystrokes for multiple applications by simply assigning a different color to each application.
Like all the other features of the dial, the LEDs can be controlled and configured through the companion app
With all the contactless hardware controls built into the dial, it’s kind of a necessity to include some form of physical feedback; the Dial uses a coin-type vibration motor to provide this really satisfying feedback, the haptics is implemented for the knob’s rotation, the capacitive touch and for the spacenav movements.
The Electronics
The dial at its core is an Arduino microcontroller board, it features the SAMD21G18 chip, which is the same chip used in the Arduino zero boards, its one of the faster Arduino boards, and its plenty capable of handling all the dial’s features.
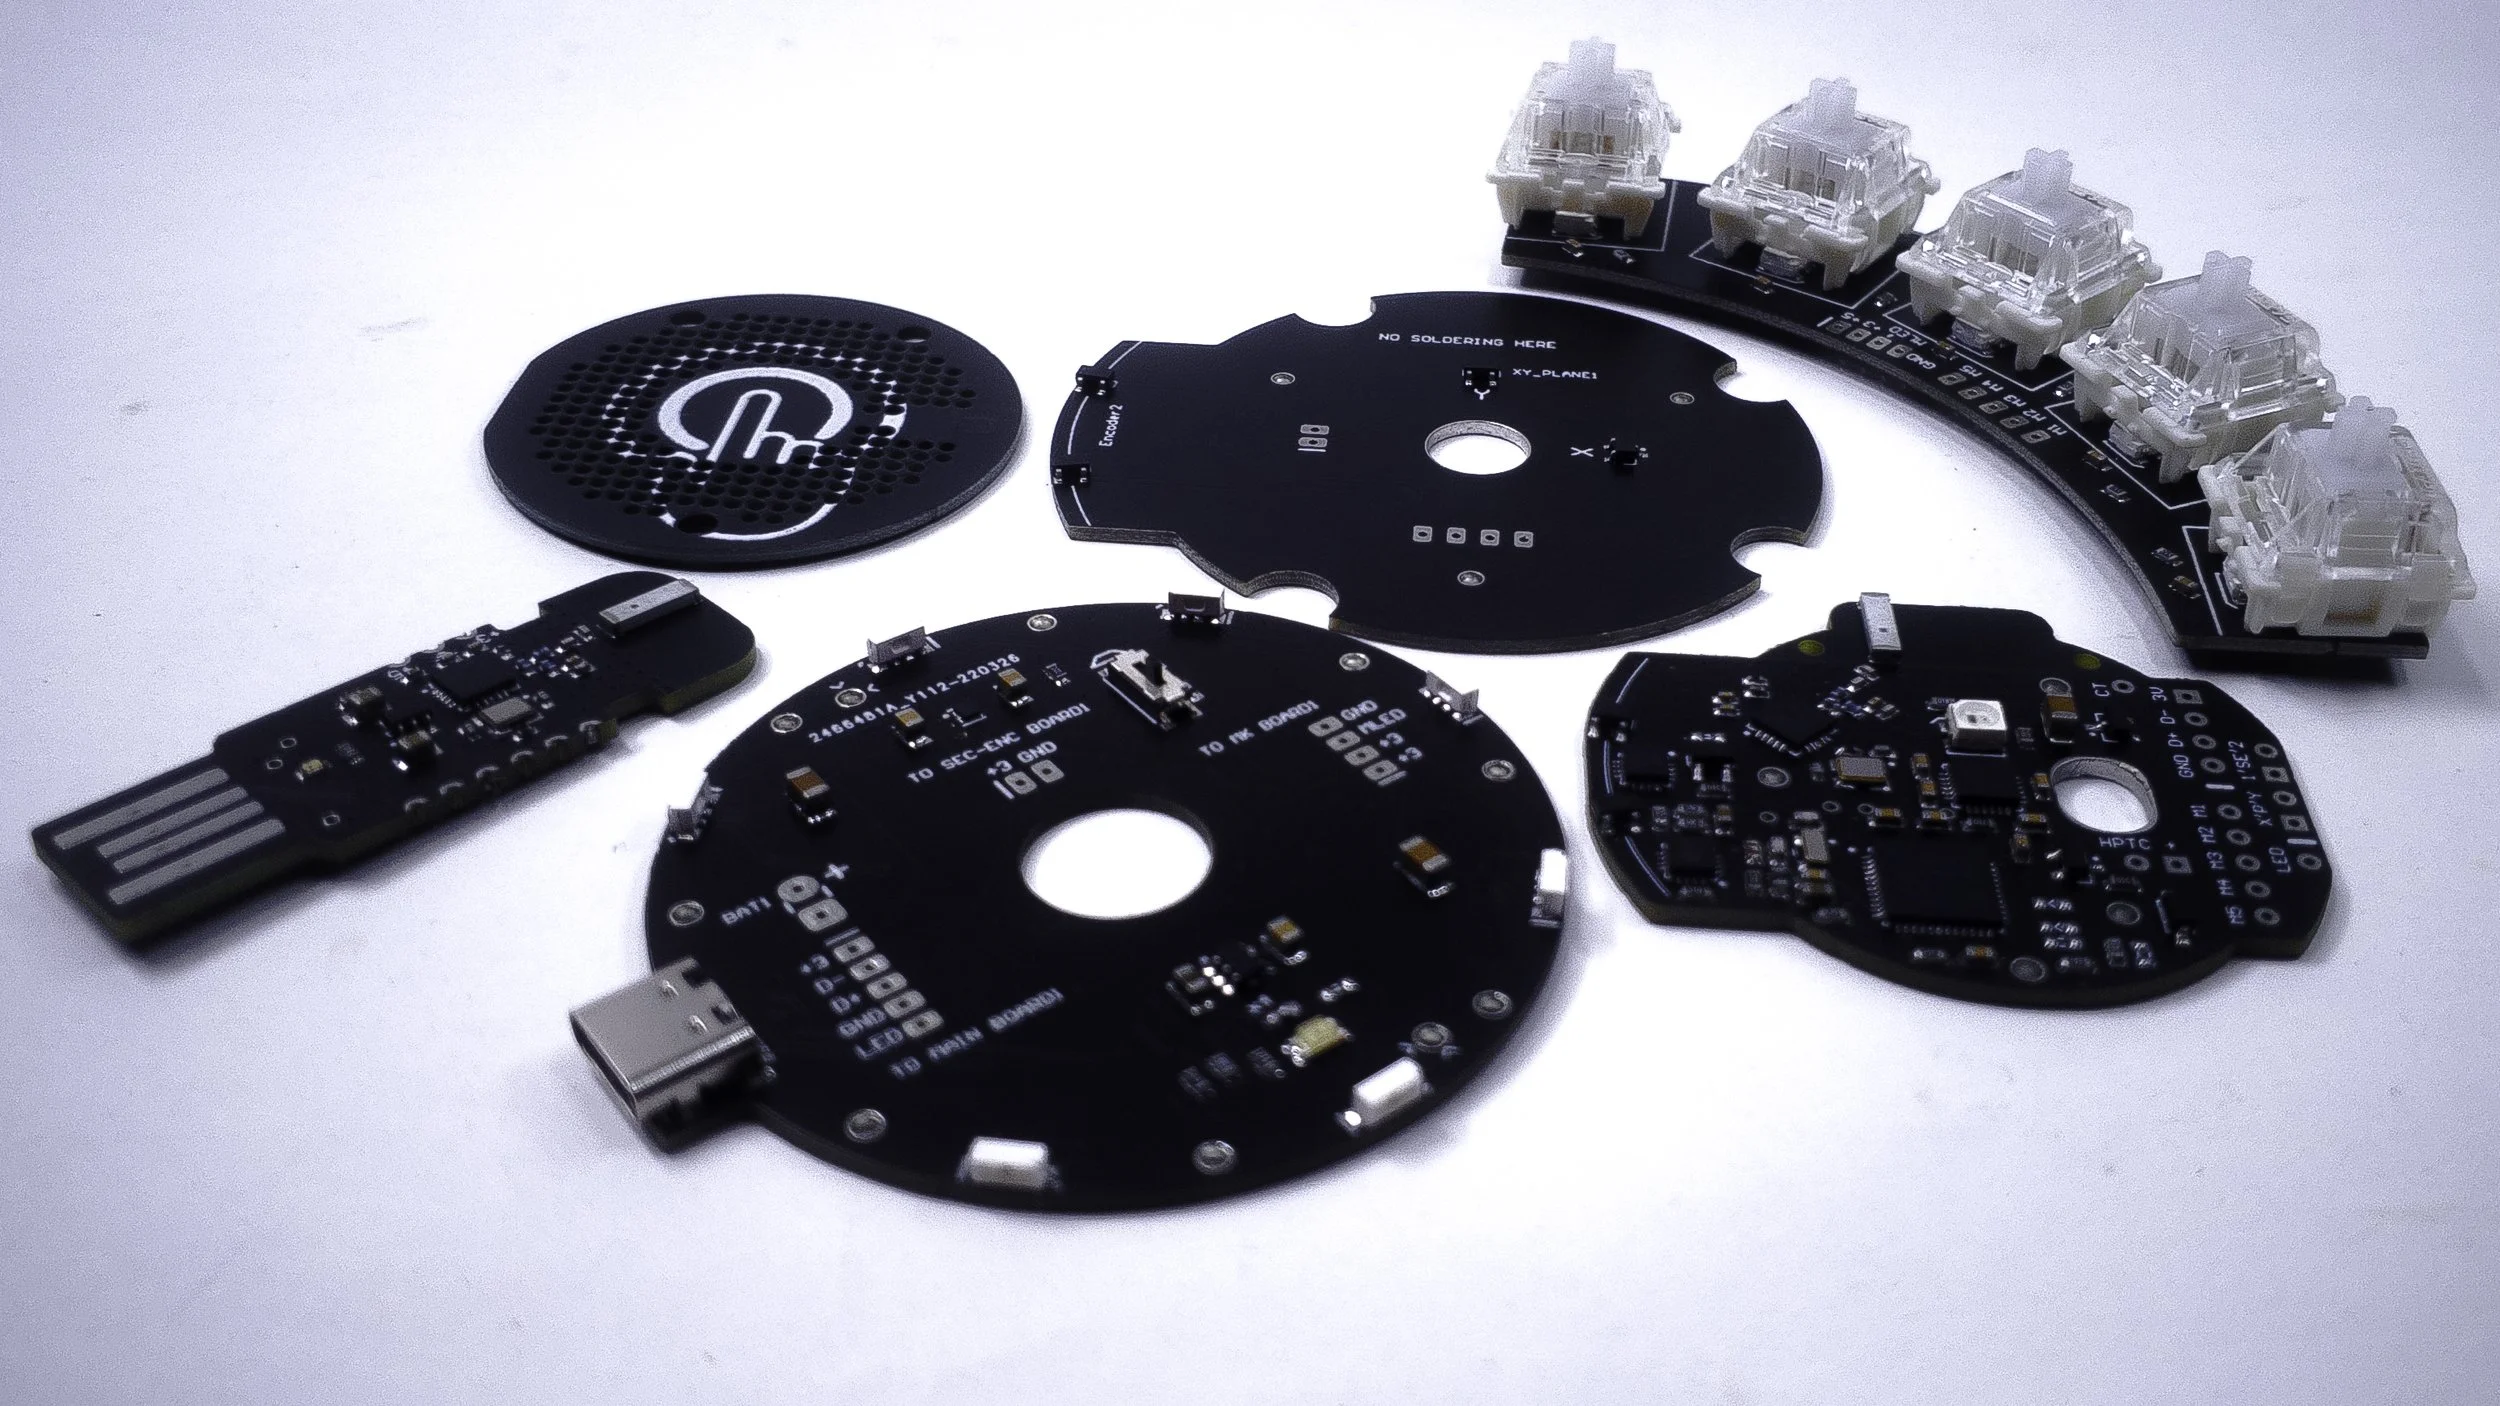
I designed 6 custom PCBs for this project, one of which is a wireless receiver based on the NRF24 chip. it allows the dial to operate untethered.
I went this route because Bluetooth hid just wasn’t going to cut it, especially for the more advanced software features, I also want to be able to control other devices around my workspace from the dial, and I believe radio communication potentially makes that a little bit easier. the dial can also be used wired through the USB type C port installed on the dial’s power board.
I have also made sure that there are no tradeoffs functionally between the wired and wireless modes. so switching between them is as simple as unplugging the USB cable from the PC and plugging in the wireless adapter or vice versa, the software on the dial is smart enough to handle the switching between the two connections.
The other custom PCBs are the mechanical switch macro board with embedded LEDs, the secondary encoder board holding the hall effect sensors for the second encoder, and the sensors for spacenav mechanism’s x-y plane.
The Companion App
When I started the development of the Ahmsville Dial, one of my top priorities was to make a device that was really easy to use, even for people with no engineering or programming skills, so I developed the companion app to help me accomplish just that; as much as I love writing code, even I don’t enjoy having to write or modify code every time I want to change the behavior of my secondary controller.
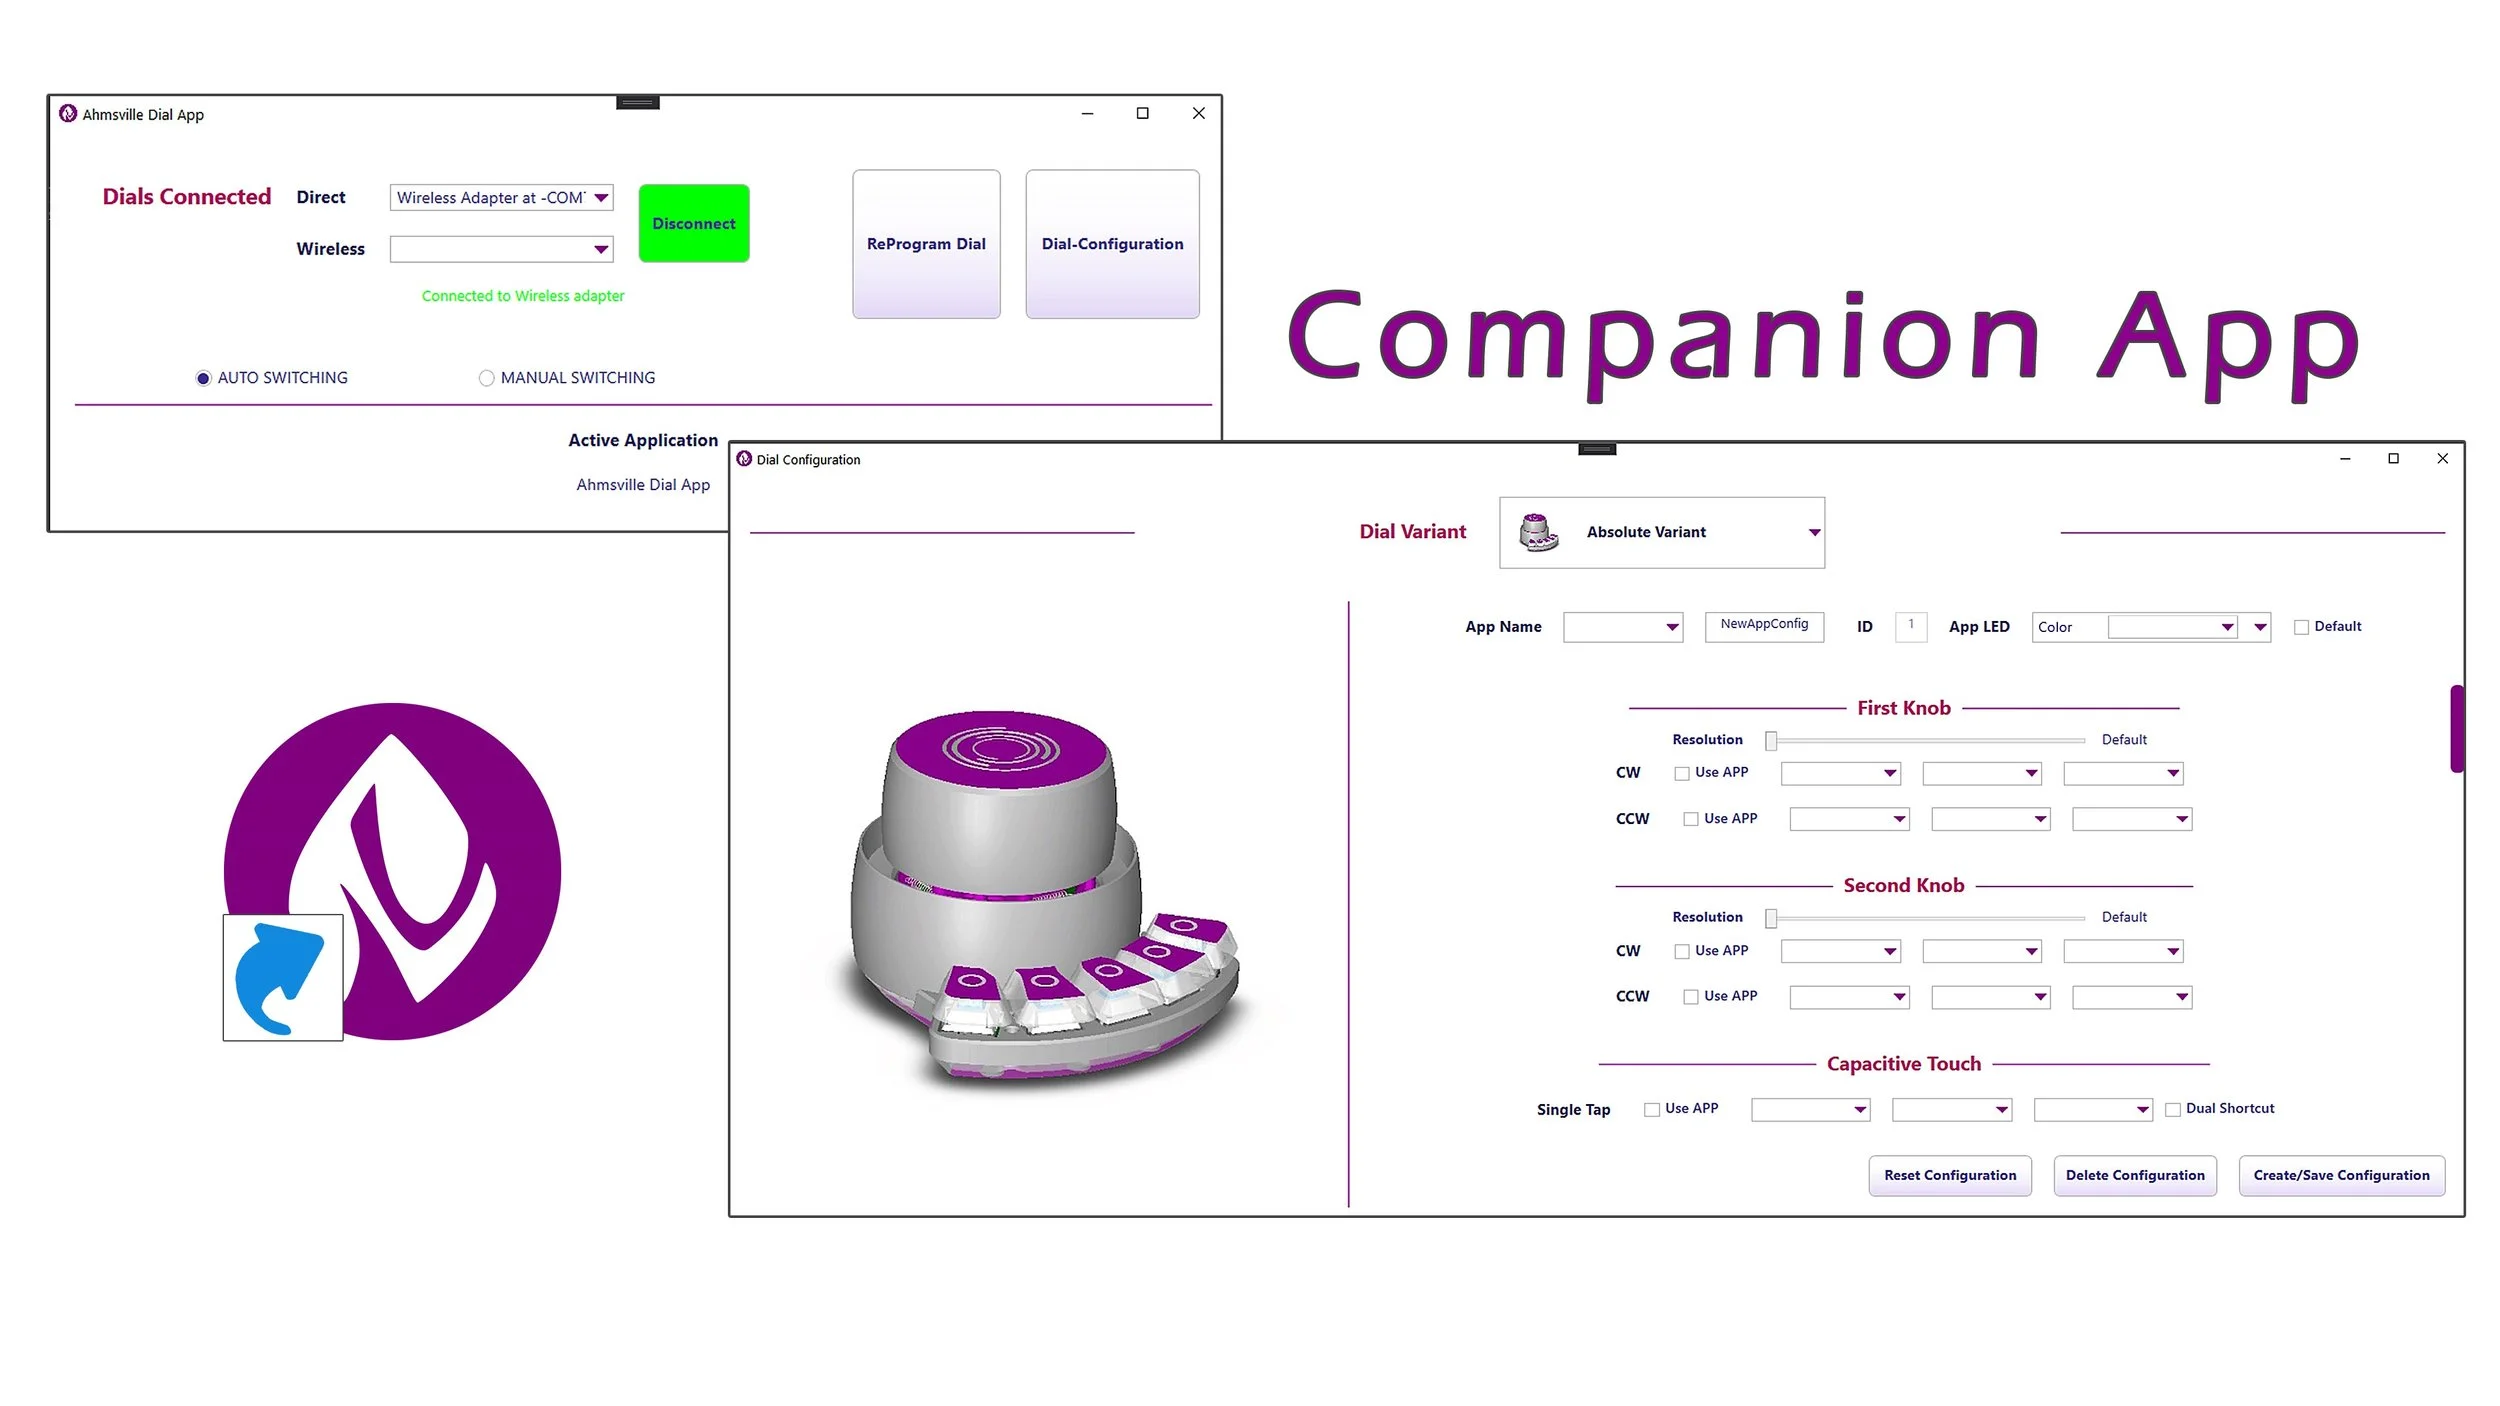
The app provides context awareness to the dial so that the configurations loaded into it can dynamically switch to match the active application on your PC, the app detects whatever window you currently have active and then communicates the appropriate information to the dial via serial communication.
This feature means that you can set a unique configuration for all your favorite apps with no overlap or repetition, the Ahmsville dial app will manage switching between the configurations.
The entire Ahmsville dial system has been designed in such a way that the user will never have to write a single line of code, not unless you have a personal reason to do so. all the configuration code required by the dial can be generated from the user interface, you can create new configuration files, and attach different operations to all the hardware controls on the dial, you can choose different key combinations, and even combine keyboard and mouse shortcuts, you can set controls to quickly launch files and application or set the keys to print long texts, you can also set the knob’s resolution and configure all the LEDs and animations on the dial, basically, anything you’ll need to configure on the dial can be done conveniently through the user interface.
The app is written to run unobtrusively in the background, so once you have the app installed and the dial configured to your liking, all other operations like connections and app switching are performed in the background.
The app runs on windows only and the release installer can be downloaded on my GitHub repository, you’ll also find setup instructions there.
Building The Ahmsville Dial
I am sure you’ve guessed as to how complex the dial is, from the hardware to the software, it’s a journey. I’ve managed to organize the build process in a way that allows for options so that you can choose exactly from where you’ll like to start your journey with the Ahmsville Dial.
Levels:
Consumer
if you are just looking for a great secondary controller, and you’re not looking to build it yourself; you can get the dial fully assembled from my store. the dials are assembled to spec by me, so depending on the variant you want, you’ll essentially be getting an exact copy of my personal dial, down to my exact software settings, needless to say, you’ll be able to change them in the app later on.
Maker
As a hardware enthusiast, you probably don’t mind putting things together, in that case, you can get the dial as a kit from my store, you’ll be able to choose between sourcing the hardware accessories yourself, or getting the full assembly kit.
Developer
The Ahmsville dial is currently on its way to becoming an Open Source Hardware, in the coming months, I’ll be releasing all the design files, as well as an SDK, so you’ll be able to build the dial from scratch, customize the companion app, and truly make the dial your own.
you can keep up with this process on my YouTube channel, and you can also check the GitHub repository to see the files that have been released.
Resources
3D files - https://gum.co/bkgfu